Sometimes you need to print separations that show the CMYK values (cyan, magenta, yellow, black). You'll have 4 new images that show only the specified ink colors.
You can do this by making a new printer preset.
file->print
print preset->custom
printer->post script file
PPD->Adobe PDF 9.0 (you may have a different #than 9.0)
You'll probably have to scroll for awhile to find the Adobe PDF selection since the list only appears to be alphabetical; mine was after Xerox.
apply the setup, marks and bleeds as needed.
output->color->separations
save the preset
You can access the new preset under print preset->separations (or whatever you named the new preset). The printer is now set to use for postscript, PPD Adobe PDF 9.0, separations
Monday, November 30, 2009
Friday, November 27, 2009
How To Make A Duotone In Photoshop CS4
Open a color photo in Photoshop
Go to image->mode->lab color
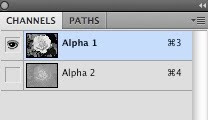
Toss channel b
Channel a is automatically renamed alpha 2
Toss alpha 2
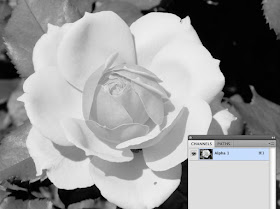
Alpha 1 remains
Go to image->mode->grayscale
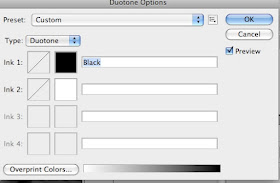
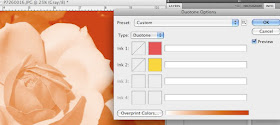
Image->mode->duotone is now available
Make sure preview is checked so you can view the changes.
Choose monotone, duotone, tritone or quadtone from the type
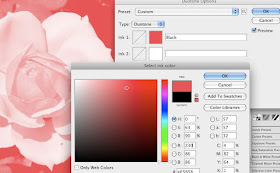
Click the colored ink 1 box
The color picker comes up.
Choose a color or go to color libraries for Pantone colors
Choose a second color by clicking the ink 2 box. I picked some pretty wild colors to make the effect apparent, I'm certain yours will look better. Remember, the colors visually mix, so it's important to pick colors you like together.
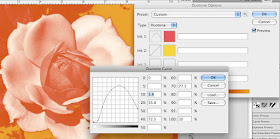
Click the square next to the top colored box. This is your duotone curve. Play around with moving the curve with your cursor to see all the effects you can achieve. Click OK
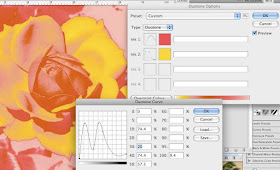
Click the next duotone curve box and move the line with your cursor. You can be subtle or go wild. When you are happy with the effect click OK. To save the image you need to name the colors (they are named already if you used Pantone). Click OK. Go to file->save as and save your new image.
Saturday, November 21, 2009
How To Make A Gradient Mask In Photoshop
To make a gradient mask open a color image.
1. Press command a, command j to make a new new layer with a duplicate image.
2. You need to change the new layer into a black and white photo. Click image->adjustments->desaturate.
3. At the bottom of the layers tab click add layer mask (it looks like a grey rectangle with a white circle in it)
4. Click the gradient tool on the side of the screen. You need to have the following settings-the gradient needs to be "foreground to transparent"-mode is normal-opacity 100%-the foreground/background color boxes towards the bottom of the tool bar need to be black on top of white (if they are not, click d on the keyboard)
5. Choose the type of gradient you want, linear, round, etc. Click on the grayscale image and drag your curser across the screen then release. Where you start and stop determines the gradient's placement. If you don't like how it looks, click command z and redo it.
This example uses the radial gradient setting and is basically done the same way.
How To Color In A Black and White Photograph With Photoshop
Here's a simple way to make a colored area in a Black and White photo using Photoshop.
1. Open a color photo in photoshop.
2. Press command a, command j to create a new layer.
3. Go to image->adjustment->desaturate to make the new layer a black and white image.
4. Use the eraser tool to erase the area you want to be in color. The eraser tool is sized by adjusting the brush size. The larger the number, the larger the area that will be removed. I start small along the edges and then use a larger brush to fill in the rest quickly. Make sure the brush hardness is set to 100 so that you have a crisp edge.
Hatching a Jeep In Photoshop
Thursday, November 19, 2009
Gouache Batik Tutorial
I tired something new, gouache batik. You draw an outline on watercolor paper with a Sharpie marker and then paint with gouache.
Cover the dry painting with India Ink and let it dry thoroughly.
Take the dry painting to the sink and let slow running water flow over the painting. The ink washes away. You control how much ink to remove, some of the paint washes away as well so work slowly.
Let the painting dry flat. You can go back and add more paint after it's dry if you want.
I used Arches 100% cotton cold pressed watercolor paper and Winsor and Newton Designers Gouache.
The painting is much prettier in person but you get the concept for the technique. Most of the shading did not photograph.
Wednesday, November 4, 2009
EDM #2 Draw Your Desk Lamp
I drew my desk lamp and it struck me that it resembled something you might find in space dock.
I remember now why I don't watercolor in this particular journal. The paint floats in some areas while it soaks in like tissue in other spots. It was a fun drawing to do even if the paper didn't cooperate. I think it's a Klingon plot.