There's a few reasons for changing CMYK colors to Pantone. Sometimes you are given a color and need to know the Pantone equivalent or you want to make a tint of a color without losing opacity.
You select the object that you want to change.
Go to Edit > Edit Colors > Recolor Artwork
Click on the box underneath the check mark for None in the photo. This limits the color groups to colors in the color swatch library.
Color Books > Pantone solid uncoated. You can choose any Pantone library you like, I prefer solid uncoated.
Click OK
You can now find the Pantone color in your Swatches panel.
To make a tint of the color, move the slider underneath the color bar (small triangle) or change the percentage.
Now you have a simple tint and if this is being sent off to a printer, it would be a one color job.
You also change the tinted areas back to CMYK for home printing by selecting the image and going to
Edit > Edit Colors > Convert to CMYK.
Showing posts with label illustrator tutorial. Show all posts
Tuesday, June 25, 2013
Sunday, June 2, 2013
How To Make A Text Clipping Mask With A Photo Background In Illustrator
Place a background image or photo in a new document in illustrator.
Type over the photo.
If you want the letters to touch.
Type > Create Outlines
Object > Ungroup
Shift the letters until you like the placement.
Object > Compound Path > Make
Move the text where you want to to see the image in the letters on the background photo.
Select both the text and the background image.
Object > Clipping Mask >Make
If you don't want the letters to touch.
Type > Create Outlines
Object > Compound Path > Make
Move the text where you want to to see the image in the letters on the background photo.
Select both the text and the background image.
Object > Clipping Mask >Make
Labels:
illustrator,
illustrator tutorial,
tutorial
Saturday, June 5, 2010
How To Clean Up Artwork Edges In Illustrator CS4 Tutorial

Most of the time it doesn't matter if your art work extends onto the desktop but sometimes you want to tidy up the edges. It's very easy to crop the excess artwork in Illustrator but if you are making a major change like this on your real artwork, make a copy of the file first.
This butterfly is from the symbols library and I'm using it for demonstration purposes but it would make a fun note card.

Access the rectangle tool and make a box that covers the area you want to keep. The second line is for the bleed since the artwork extends to the edge. If you are using this for the web or your own printer you wouldn't bother with a bleed.

Change the fill and stroke color to none. Press command a to select everything or go to select->all.

Go to object->clipping mask->make and ta da!
Labels:
illustrator,
illustrator tutorial
Friday, June 4, 2010
How To Use The Rotate Tool To Make A Simple Flower Tutorial Illustrator CS4
The purpose of this tutorial is to show how to use the rotate tool; if you've ever done this by hand you will particularly appreciate how easy Illustrator makes this.
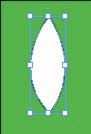
To make a simple flower start by making a petal. Click the direct selection tool (white arrow) then the pen tool. Click the mouse to make the top point of the the petal. Click and hold the mouse down to make the bottom point. Use the mouse to drag out the curve. When you are happy with the curve, release the button. Option click (alt click for windows) on the bottom point then option click on the top point to close the path. Do not release the mouse button since you want to drag out the curve. Release the mouse button when you are happy with the curve. Deselect the shape (shift command a) and if you want to adjust the shape use the direct selection tool (white arrow) to manipulate the handles. Click on the petal with the selection tool (black arrow) to select the petal.

Click on the rotate tool. The circle with the cross hairs is the anchor point.
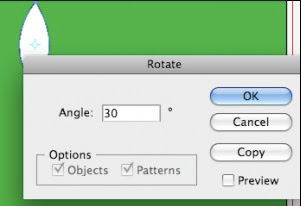
You can set the angle of the rotation in the rotation dialog box. Remember that a circle is 360 degrees so if you want the object to space evenly the angle has to be evenly divisible. For example a 30 degree angle will give you 12 petals. Click copy to make a second petal
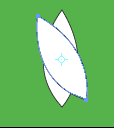
If you don't reset the anchor point, it will be in the middle of the petal and that's where the rotation will occur

To reset the anchor point, option click (on the circle with the cross hairs) and drag the anchor point into place. Don't release the mouse button until you are happy with the new location. I like to hold the option key down while I do this but it's not necessary.

To make more petals you transform again by pressing command d. Keep pressing command d until you have all the petal you want. Shift command a to deselect. To make a round center activate the ellipse tool. Place the cursor in the flower center. Hold shift and option while dragging out the shape. Holding shift and option constrains the circle so that it remains in the center of your petals and it's easier to gauge the size you need. You can adjust the circle later with the selection tool.
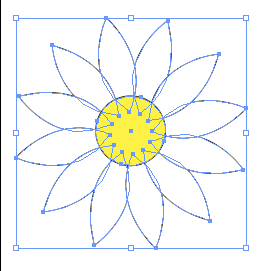
If you want to move the flower around it's easier if the shape is grouped together. Drag over the flower with the selection tool to select it all. Go to object->group or use the keyboard shortcut command g
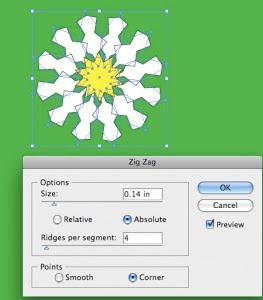
You can make kaleidoscope effects by going to effects->distort and transform.

To make a simple flower start by making a petal. Click the direct selection tool (white arrow) then the pen tool. Click the mouse to make the top point of the the petal. Click and hold the mouse down to make the bottom point. Use the mouse to drag out the curve. When you are happy with the curve, release the button. Option click (alt click for windows) on the bottom point then option click on the top point to close the path. Do not release the mouse button since you want to drag out the curve. Release the mouse button when you are happy with the curve. Deselect the shape (shift command a) and if you want to adjust the shape use the direct selection tool (white arrow) to manipulate the handles. Click on the petal with the selection tool (black arrow) to select the petal.

Click on the rotate tool. The circle with the cross hairs is the anchor point.

You can set the angle of the rotation in the rotation dialog box. Remember that a circle is 360 degrees so if you want the object to space evenly the angle has to be evenly divisible. For example a 30 degree angle will give you 12 petals. Click copy to make a second petal

If you don't reset the anchor point, it will be in the middle of the petal and that's where the rotation will occur

To reset the anchor point, option click (on the circle with the cross hairs) and drag the anchor point into place. Don't release the mouse button until you are happy with the new location. I like to hold the option key down while I do this but it's not necessary.

To make more petals you transform again by pressing command d. Keep pressing command d until you have all the petal you want. Shift command a to deselect. To make a round center activate the ellipse tool. Place the cursor in the flower center. Hold shift and option while dragging out the shape. Holding shift and option constrains the circle so that it remains in the center of your petals and it's easier to gauge the size you need. You can adjust the circle later with the selection tool.

If you want to move the flower around it's easier if the shape is grouped together. Drag over the flower with the selection tool to select it all. Go to object->group or use the keyboard shortcut command g

You can make kaleidoscope effects by going to effects->distort and transform.
Labels:
illustrator,
illustrator tutorial
Monday, November 30, 2009
How To Print Color Separations From Indesign
Sometimes you need to print separations that show the CMYK values (cyan, magenta, yellow, black). You'll have 4 new images that show only the specified ink colors.
You can do this by making a new printer preset.
file->print
print preset->custom
printer->post script file
PPD->Adobe PDF 9.0 (you may have a different #than 9.0)
You'll probably have to scroll for awhile to find the Adobe PDF selection since the list only appears to be alphabetical; mine was after Xerox.
apply the setup, marks and bleeds as needed.
output->color->separations
save the preset
You can access the new preset under print preset->separations (or whatever you named the new preset). The printer is now set to use for postscript, PPD Adobe PDF 9.0, separations
You can do this by making a new printer preset.
file->print
print preset->custom
printer->post script file
PPD->Adobe PDF 9.0 (you may have a different #than 9.0)
You'll probably have to scroll for awhile to find the Adobe PDF selection since the list only appears to be alphabetical; mine was after Xerox.
apply the setup, marks and bleeds as needed.
output->color->separations
save the preset
You can access the new preset under print preset->separations (or whatever you named the new preset). The printer is now set to use for postscript, PPD Adobe PDF 9.0, separations
Labels:
illustrator tutorial,
photoshop tutorial
Monday, June 1, 2009
Vector Flower Circle Bouquet

It's cold outside so I used Illustrator to play in an imaginary garden. I know grungy, muted colors are in fashion but I prefer the brighter colors in the box.
I surround myself with color. The foyer is pumpkin orange, the dining room has a cranberry red wall, the living room has a hunter green wall, the kitchen is butter yellow with a black white border and floor and my bedroom is Caribbean blue. I don't have window treatments, I have plants.
There is a nice tutorial for doing this at bittbox
Labels:
illustrator,
illustrator tutorial,
tutorial
Thursday, May 28, 2009
How to make a simple magnifying glass in Illustrator

The trick to this illusion is to make 2 copies of the text; one is larger than the other. Use object->clipping mask->make to make a clipped version of the word and move the smaller version of the word to the back.
Labels:
illustrator,
illustrator tutorial,
tutorial
Subscribe to:
Posts (Atom)


