I had this metal table at the cabin and always meant to paint cherries on the dangling drops but went a different way after I put my purse on top.
I wanted her to have an "oh no" look when items were placed on the surface. I painted the illustration in a cartoon style with very bright colors in order to keep the painting from becoming sinister. The funny thing is, after I painted her, no one uses the table any more.
To ensure good paint adhesion I base coated the top with Gesso.
Thursday, June 10, 2010
Wednesday, June 9, 2010
Thank You Poster For Meals on Wheels Volunteers
I made this poster for a local chapter of Meals on Wheels using photographs of volunteers supplied by Meals on Wheels.
They wanted to put up a poster to thank volunteers for all the hard work they do since Meals on Wheels couldn't exist without them.
I originally designed the poster in an 8" x 10" format so they could print it easily but I redid it in a tabloid size.
Labels:
illustrator
Saturday, June 5, 2010
How To Clean Up Artwork Edges In Illustrator CS4 Tutorial
Most of the time it doesn't matter if your art work extends onto the desktop but sometimes you want to tidy up the edges. It's very easy to crop the excess artwork in Illustrator but if you are making a major change like this on your real artwork, make a copy of the file first.
This butterfly is from the symbols library and I'm using it for demonstration purposes but it would make a fun note card.
Access the rectangle tool and make a box that covers the area you want to keep. The second line is for the bleed since the artwork extends to the edge. If you are using this for the web or your own printer you wouldn't bother with a bleed.
Change the fill and stroke color to none. Press command a to select everything or go to select->all.
Go to object->clipping mask->make and ta da!
Labels:
illustrator,
illustrator tutorial
Friday, June 4, 2010
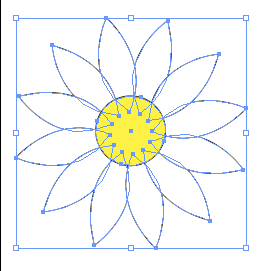
How To Use The Rotate Tool To Make A Simple Flower Tutorial Illustrator CS4
The purpose of this tutorial is to show how to use the rotate tool; if you've ever done this by hand you will particularly appreciate how easy Illustrator makes this.
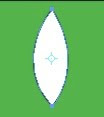
To make a simple flower start by making a petal. Click the direct selection tool (white arrow) then the pen tool. Click the mouse to make the top point of the the petal. Click and hold the mouse down to make the bottom point. Use the mouse to drag out the curve. When you are happy with the curve, release the button. Option click (alt click for windows) on the bottom point then option click on the top point to close the path. Do not release the mouse button since you want to drag out the curve. Release the mouse button when you are happy with the curve. Deselect the shape (shift command a) and if you want to adjust the shape use the direct selection tool (white arrow) to manipulate the handles. Click on the petal with the selection tool (black arrow) to select the petal.
Click on the rotate tool. The circle with the cross hairs is the anchor point.
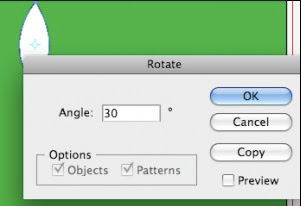
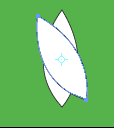
You can set the angle of the rotation in the rotation dialog box. Remember that a circle is 360 degrees so if you want the object to space evenly the angle has to be evenly divisible. For example a 30 degree angle will give you 12 petals. Click copy to make a second petal
If you don't reset the anchor point, it will be in the middle of the petal and that's where the rotation will occur
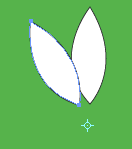
To reset the anchor point, option click (on the circle with the cross hairs) and drag the anchor point into place. Don't release the mouse button until you are happy with the new location. I like to hold the option key down while I do this but it's not necessary.
To make more petals you transform again by pressing command d. Keep pressing command d until you have all the petal you want. Shift command a to deselect. To make a round center activate the ellipse tool. Place the cursor in the flower center. Hold shift and option while dragging out the shape. Holding shift and option constrains the circle so that it remains in the center of your petals and it's easier to gauge the size you need. You can adjust the circle later with the selection tool.
If you want to move the flower around it's easier if the shape is grouped together. Drag over the flower with the selection tool to select it all. Go to object->group or use the keyboard shortcut command g
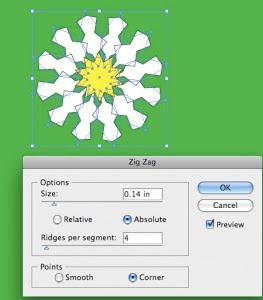
You can make kaleidoscope effects by going to effects->distort and transform.
Labels:
illustrator,
illustrator tutorial
Thursday, June 3, 2010
Blurred Background with Clipping Mask With The Pen Tool In Photoshop CS4 Tutorial
Sometimes a photo has too much going on in the background and it's distracting from the focus of the image.
I chose to use the pen tool to make a clipping mask so that I could blur the background (I also inserted her in front of a dragon with the same clipped image).
I like the pen tool because it gives a smooth, sharp edge but it's only practical for edges that are not overly intricate.
Go to file->open and select the photo you want to work with. Make a duplicate layer of the source photo.
Magnify the image so that you can see the edges clearly, command + or the magnify tool works well for this.
Use the pen tool to draw a line along the area you want to mask. I like to stay slightly inside the image to avoid having a pixilated (stair stepped) edge.
Option click (alt for windows users) on the anchor point when you change directions and option click on the final anchor point to close the path at the end. Pressing the space bar temporarily changes the tool to one that allows you to move the image.
You can adjust the path with the handles but I usually try to drag the curves out where I want them to minimize changes. The fewer points you make, the smoother your line will be. Try not to click on the smooth part of the curve since that will give you a more elegant line.
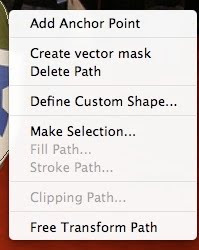
With the pen tool still selected, right click on the line and click make selection.
Now you have a dashed line (some call it marching ants), this is your clipping path. Press command c or edit->copy to save the selection.
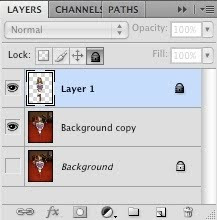
Make a new layer and paste the clipped object onto it using command v or edit->paste.
Save the file since you don't want to have to make the path again; now you can play with the background. The image can be inserted into another photo or you can alter the background with effects. I chose to activate the background copy layer and apply a blur by going to filter->blur->Gaussian blur.
Labels:
photoshop,
photoshop tutorial
Subscribe to:
Posts (Atom)