Thursday, January 31, 2013
New Blog 365 Projects Exporing Subjects For 30 Days
Here is the header for my newest blog, 365 Projects
I just made the favicon for it and discovered that Blogger now has a spot to insert a favicon on the layout page. Yippee! No more writing code.
I'm very pleased with the logo since it's replete with symbolism for me but I won't bore you with the layers of meaning.
Labels:
illustrator
Wednesday, January 30, 2013
Illustrated March Calendar To Do List
I love paper planes, they symbolize freedom and possibilities, which can be in short supply in one of our endless Minnesota winters.
Winter is great but by the end of March it seems like enough for one year. My friends on the west coast are putting in gardens while I'm trying to decide whether to chip dog poo out of the ice or salt the spot the mail carrier keeps getting stuck in by the mailbox.
Labels:
illustration,
illustrator
Tuesday, January 29, 2013
Illustrated February Calendar To Do List
As the job is done, I cross off the date.
I try to clean something beyond day to day cleaning, doing dishes doesn't count. It's my way of keeping up with household tasks without a major time commitment.
Most of the jobs are usually pretty quick but this helps keep me on track and perhaps someday I'll be able to play the guitar well or hold a conversation in Spanish without asking why Grandma has a parrot on her head.
Labels:
illustration,
illustrator
Monday, January 28, 2013
Beach Themed Love Note Treasure Hunt
I normally do riddle laden scavenger hunts for Birthdays but this time I did something a little different.
I took a sand dollar image, duplicated it and printed it on heavy paper with messages about what makes him special. I did one message for each year.
I put a little sand from one of our trips in the bottom of a container and then layered the messages and sand until the container was filled.
He then had to dig through the sand with his fingers to find the messages.
Labels:
craft,
directions,
free download
Thursday, January 24, 2013
Only Boring People Are Bored Poster
 I get restless but never bored. There is always something interesting to do but it would be better if it was done in a new location; preferably Fiji.
Available on Etsy
Labels:
illustrator,
poster
Wednesday, January 23, 2013
Rasta Umbrella Bob Marley Quote Poster
Some people feel the rain. Others just get wet.
The Rasta rain flows off the edge of the paper.
Jamaica was the first stamp in my passport and the country has a very special place in my heart. It's where I learned to sail and snorkeling was a lot more fun when the fish are colors other than beige.
Available on Etsy
Labels:
illustration,
illustrator,
poster
Tuesday, January 22, 2013
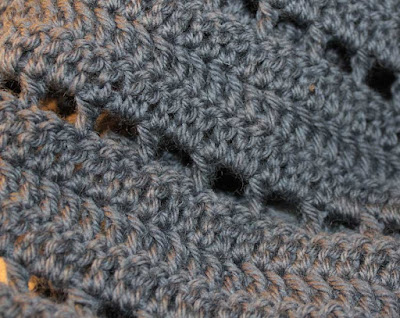
Chasing Buses Double Crochet Filet Stitch Scarf Pattern
Alethea had scarf envy and handed me a small ball of wool yarn. I knew I needed an airy design to compensate for limited resources but she also wanted a warm scarf.
I called the pattern Chasing Buses since my other daughter just started taking classes at the U of M and she had multiple bus adventures today. The solid parts represent the streets and the holes are her footsteps in the snow as she ran.
The first row is the filet stitch followed by 3 rows of double crochet.
Here is the pattern.
Use the crochet hook size recommended by the weight of your yarn. This scarf was done using a G hook.
I chained on 30 stitches since the scarf is worked in a repeating pattern of three and I prefer odd numbers.
Insert your hook in the 6th chain from the hook and DC, chain 2, DC in the 3rd chain from the last stitch. Repeat DC, chain 2, DC until you reach the end of the chain. Chain 3 and turn. (You now have a row of 9 filet stitches)
The chain 3 is your first stitch.
2 DC in the chain 2 space. DC in the top of the previous filet double crochet stitch. Continue across the first row. Chain 3 and turn. You will have 28 DC stitches.
DC across the top of the second row. When you get to the end, chain 3 and turn.
DC across. You now have 3 rows of solid DC. When you get to the end, chain 5 and turn.
The chain 5 is one side and the top of your first filet stitch. Double crochet in the 3rd stitch over. Chain 2. Repeat DC, Chain 2, DC until you reach the end. Chain 3 and turn.
Do 3 more rows of DC followed by a filet row. Continue pattern until you achieve the desired length. I would have added fringe to the ends but ran out of yarn.
Labels:
craft,
crochet,
directions
Monday, January 21, 2013
Macchiato Colored Crocheted Scarf
I still had a lot of yarn left so I made a scarf using the pattern by Catherine South.
The scarf and the two hats used a total of 3 large skeins of yarn.
Nissa likes texture and the stitch has a fun little crossover bump every few stitches.
Labels:
craft,
crochet,
directions
Friday, January 18, 2013
Ribbed Crochet Winter Stocking Hat
I had a lot of brown yarn left over so I tried another hat pattern, this one is from Crochet Geek. It's very warm and was much easier to fit.
Nissa was beginning to get a little concerned when I kept calling her to try it on since the yesterday's hat was too large and first trial fitting for this one was too tight.
I made this one 5 stitches longer than the pattern called for since she's going to be taking the bus to the U of M and I wanted to make sure the cuffed portion covered her ears.
Labels:
craft,
crochet,
directions
Thursday, January 17, 2013
Cocheted Puppy Dog Hat

I made this hat using the cute pattern at Repeat Crafter Me.
It may have turned out a bit larger than I intended but Nissa wore it all day in the house; which was awfully sweet of her.
Next time I make this hat I'll use a smaller crochet hook than the one recommended, a tighter stitch and have one less row across the bottom so it doesn't sit so low on the face.
It would be fun to use the pattern to make a cunning hat like the one Jayne Cobb wore on Firefly.
Wednesday, January 16, 2013
Forest Tree Face Sculpted From Clay
This face was so huge it took almost a month to dry.
I formed it over a plastic covered bowl so it wouldn't be too solid. The bark features were made by adding clay and forming ruts with my fingers.
The leaves were individually made, scored, and placed with slip.
The hardest part was transporting it, freshly made, home from the cabin in a car filled with dogs. I never thought it would survive but it somehow made the trip intact, didn't break in the kiln, and avoided being nabbed by the art thieves that plagued Nissa's class. We lost a surprising number of items.
Labels:
clay,
directions,
sculpture
Tuesday, January 15, 2013
Monday, January 14, 2013
Bowl Carved With A Zig Zag Cake Decorating Tool
You take the zig zag surface tool from Wilton's cake decorating line and heavily incise the surface. You need to do this before it's leather hard but not too soft or you'll cave in the sides.
Labels:
clay,
directions
Friday, January 11, 2013
A Platter of Clay Heads
Nothing says a party like a plate full of clay heads. A few of them are waiting for antlers, hair, and a rather stylish Mohawk.
The bottoms have a hole so that they can have a supported inserted inside.
The bottoms have a hole so that they can have a supported inserted inside.
Thursday, January 10, 2013
Pottery Mustache Man Vase
Fredrick has a huge mustache and ears that Will Smith would love. He kept begging; but I told him you need to show me you can handle pens before I move you up to Sharpies.
Wednesday, January 9, 2013
Clay Tree Spirit
The tree spirit is made of leaves with a bark nose, eye brows and lips. His eyes are acorns. Next spring he'll be moving to the woods by our cabin so he can keep the Nisse in line.
Tuesday, January 8, 2013
Clay Mermaid With Copper Hair
Lorilei has copper wire hair embellished with sea glass beads. I thought about the smooth, silky hair that you always see on mermaids but have you seen what salt water does to your hair?
Monday, January 7, 2013
Monster Face Pot With Horns
Henry started out as a vase. I built up his cheeks, cut out his smile and left a gnarly tooth. I particularly like the lopsided horns.
Friday, January 4, 2013
Thursday, January 3, 2013
Wavy Textured Pottery Bowl
I had a mishap while this bowl was drying. I went to move it and broke a chunk out of the top. I almost tossed but sometimes accidents make things better.
I cut the top edge in a random wavy pattern and used a wire brush to texture the outside of the bowl. The bowl looks better after the mishap than it did before.
Labels:
clay,
directions
Wednesday, January 2, 2013
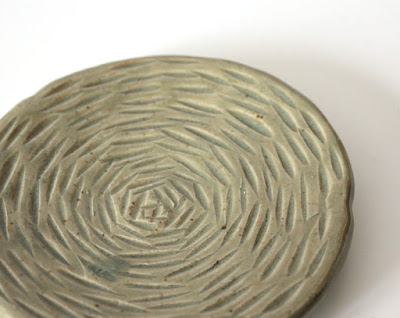
Assorted Carved Pottery Plates

The pattern was done with the tip of a church key. The piece has to be soft leather hard, if it's too dry the tool doesn't press in smoothly.

These were both done with the curved side of a flexible metal tool.
The same metal tool was used here but the cut was deeper and closer together.
The tip of the loop tool was pressed in lightly, then deeper, then lightly.
I used a small melon baller to scoop out the clay.
This surface resembles an orange. The surface was leather hard and I gently cut out small random bits with the smallest part of the loop tool.
Labels:
clay,
directions
Tuesday, January 1, 2013
Carved Pottery Hand Shaped Soap Dish
I took a thrown pottery plate and free hand cut out a hand shape. I put in palm creases but some of the lines filled in after glazing.
I planed on it being a soap dish but it shrank to the point where it would hold guest soaps, now it holds rings.
I planed on it being a soap dish but it shrank to the point where it would hold guest soaps, now it holds rings.
Labels:
clay,
directions,
sculpture
Subscribe to:
Comments (Atom)


