Saturday, July 13, 2013
How To Make a Recycled Envelope Book with Scrapbook Paper Instead of Envelopes.
I remembered seeing an envelope book and thought I could use some more scrapbook paper to make something similar. I chose a tropical theme and will use it for my next vacation.
I grabbed a book from the stack that I'm donating to the library and carefully cut the book free from the cover with a razor blade. I'm keeping the pages since I plan to incorporate them into the finished book later.
I measured the spine to see how big to make the insert. This book is 1.25 inches wide.
Now for the math.
I want the insert to be a little smaller than the spine so that it can lay normally when the pages are filled and the "envelopes" are filled. My spine is 1.25" wide so a 1" wide insert will fit well.
I want a 1/2" flange so the larger piece of paper is 2" x 8.75 (the length of the page I want the finished book to have minus .25")
I want to have a .25" space between the flanges so the next 2 pieces of paper are 1.5" wide.
The fold lines are indicated with a dashed line. A scoring board is very helpful but not required.
The center flange is glued together inside. I used Tacky glue since that was what I had on hand and a glue stick would be strong enough.
All 3 folded flanges nest inside each other and are glued along the bottom.
I used scrapbook card stock to make the spine flange.
The book spine isn't stable enough to glue the spine flange to, so I cut a piece of cardboard to size and glued it in place.
I glued on new endpapers to cover the existing ones and cover the cardboard covered spine. I used white scrapbook paper and since the book is wider than 12" I have a seam in the center.
Make sure you fold the book closed to ensure you don't have the paper glued too tight.
I plan to decorate the endpapers with art so the white will suit my needs but a more interesting end paper would be fun.
Glue the center flange in place.
My finished envelope pages will be 5.5 x 9 inches. Scrapbook paper is only 12" so I needed to piece the envelope sleeve.
I cut the sleeve 5.5 x 9.5 and folded each piece .5 inch on opposite ends.
Glue the 2 pieces of paper together with the folds on opposite sides to reduce bulk at the seam.
Put glue on both sides of each individual flange and slide the envelope sleeve on. Press in place. Check the pages by turning them (like you were reading a book) since they need to have a little space for turning and you don't want the pages too tight.
The finished book. I'll be cutting watercolor paper to size so I can use to as a travel journal. The nice thing is the scrapbook pages are acid free so it won't hurt the artwork.
Labels:
bookmaking,
bookmaking tutorial,
tutorial
Thursday, July 11, 2013
How To Make A Book With Pockets From A Sheet Of 12" Scrapbook Paper
I have a bunch of scrapbook paper that I don't know what to do with. I thought a book might be good since the paper is acid free and nice quality. This is a cross between a couple of other books I've previously made and I think it turned out cute.
You don't need a Martha Stewart Crafts Scoring Board and Envelope Tool but it sure makes life good. You rest the paper against the guides and run a bone folder along the groove.
Score a piece of 12 inch scrapbook paper along the above lines. Fold along the scored lines.
Cut along the dashed line but do NOT cut the remaining 3 inches.
Fold the first side accordion style.
Now's the tricky part. When you get to the end of the first side, you fold the uncut edge backwards so that you can continue to fold the remainder of the book accordion style.
You can see the open space where the uncut side was folded.
Glue the back side of the pages together. I just used a glue stick.
To prevent things falling out of the pockets, I taped the edge with decorative tape and trimmed the excess. Washi tape would be great but I used decorative tape that I found at Target.
You can see the backs of the pages are glued and the 3 open folder edges have been taped.
The cover of the finished book.
You can use the pockets for credit cards, business cards, or mementos. The paper is acid free so it would be nice to draw on the white portion and keep small items in the pocket. I think I might glue some of these inside the cover of my artist journals.
Labels:
bookmaking tutorial,
craft,
tutorial
Wednesday, June 26, 2013
How To Make A Glitter Texture In Photoshop
I was going to photograph some glitter to use as a texture but I found this nifty tutorial from ScrapbookBytes.
Here are my notes:
Open a new square document in Photoshop (make sure the color is set to RGB not CMYK, the filters won't work in CMYK. Make the document 8 bit.)
Fill with grey #B3b3b3 (I tired 50% grey and it was too dark)
Filter > Texture > Grain. Select Sprinkle from the drop down menu. Intensity 35. Contrast 50. OK
Filter > Pixelate > Crystallize. 3%
Command J to duplicate the layer. Edit > Transform > Rotate 90 CW. Blend mode Multiply.
Repeat - Command J to duplicate the layer. Edit > Transform > Rotate 90 CW. Blend mode Multiply.
Merge the layers and save the file in case you want to make more glitter. This is the base you work off. I saved mine as glitter_blendModeOverlay.jpg
To color the glitter:
Open the new glitter base in Photoshop.
Add a new layer. Fill with a color. For the gold glitter I used #BC9D20. Blend mode Overlay.
Labels:
photoshop,
photoshop tutorial,
tutorial
Tuesday, June 25, 2013
How To Change CMYK To Pantone In Illustrator
There's a few reasons for changing CMYK colors to Pantone. Sometimes you are given a color and need to know the Pantone equivalent or you want to make a tint of a color without losing opacity.
You select the object that you want to change.
Go to Edit > Edit Colors > Recolor Artwork
Click on the box underneath the check mark for None in the photo. This limits the color groups to colors in the color swatch library.
Color Books > Pantone solid uncoated. You can choose any Pantone library you like, I prefer solid uncoated.
Click OK
You can now find the Pantone color in your Swatches panel.
To make a tint of the color, move the slider underneath the color bar (small triangle) or change the percentage.
Now you have a simple tint and if this is being sent off to a printer, it would be a one color job.
You also change the tinted areas back to CMYK for home printing by selecting the image and going to
Edit > Edit Colors > Convert to CMYK.
You select the object that you want to change.
Go to Edit > Edit Colors > Recolor Artwork
Click on the box underneath the check mark for None in the photo. This limits the color groups to colors in the color swatch library.
Color Books > Pantone solid uncoated. You can choose any Pantone library you like, I prefer solid uncoated.
Click OK
You can now find the Pantone color in your Swatches panel.
To make a tint of the color, move the slider underneath the color bar (small triangle) or change the percentage.
Now you have a simple tint and if this is being sent off to a printer, it would be a one color job.
You also change the tinted areas back to CMYK for home printing by selecting the image and going to
Edit > Edit Colors > Convert to CMYK.
Labels:
illustrator,
illustrator tutorial,
tutorial
Monday, June 24, 2013
How To Make An Artistic Colored Gradient in Photoshop
I recently was looking through a magazine and saw a pretty black and white fashion photo with a pink gradient and I had to try to duplicate it.
Place your photo in Photoshop.
To make it black and white go to Image > Adjustments > Channel Mixer
Check Monochrome. Click OK
New Fill or Adjustment Layer > Gradient.
Click on the gradient in the Gradient Fill screen to bring up the Gradient Editor.
Choose a color to fill the little paint bucket. I used a Miami Vice style pink F87a7a.
100% Opacity is too intense so you want click on the box over the paint bucket to bring up the opacity slider. I used 42%.
Adjust the angle so that it looks right.
The image on the left is how it looks after the gradient is applied. The right version had the blending mode Multiply applied.
Place your photo in Photoshop.
To make it black and white go to Image > Adjustments > Channel Mixer
Check Monochrome. Click OK
New Fill or Adjustment Layer > Gradient.
Click on the gradient in the Gradient Fill screen to bring up the Gradient Editor.
Choose a color to fill the little paint bucket. I used a Miami Vice style pink F87a7a.
100% Opacity is too intense so you want click on the box over the paint bucket to bring up the opacity slider. I used 42%.
Adjust the angle so that it looks right.
The image on the left is how it looks after the gradient is applied. The right version had the blending mode Multiply applied.
Labels:
photoshop,
photoshop tutorial,
tutorial
Sunday, June 23, 2013
Free High Resolution Downloads From the Rijks Museum
You can download high resolution art from the Rijks Studio for your own personal use and commercial use is negotiable. I had to take the service for a spin. The resolution of the Rembrandt self portrait download is 7.3 x 8.3 inches at 300 pixels per inch. Cool, no wonder Rembrandt looks so surprised, or it could be the hipster eye glasses.
Labels:
illustrator
Saturday, June 22, 2013
July Checklist Calendar Illustration in Illustrator Watermelon Flowers
Botanical crossbreeding. This is what happens when watermelon and sunflowers are planted in the same field.
Labels:
illustration,
illustrator
Friday, June 21, 2013
Vintage Minnesota Advertising Map Powers Deptartment Store
Vintage pictorial maps are so much fun, I wish people still did them more.
The oddest cartoon is of a criminal in Stillwater State Prison wishing he could go to "dat" Powers sale.
Labels:
poster
Wednesday, June 19, 2013
Fry Cook On Venus Ferris Bueller Retro Space Age Poster
Now this would be a fun career day; Saturn off in the distance while a space ship rockets over the Venus diner.
Available on Etsy
Labels:
illustrator,
poster
Tuesday, June 18, 2013
Mice Snuggling On A Mushroom Under A Full Moon Poster
If you live to be a 100, I want to live to be a 100 minus 1 day so I never have to live without you. Winnie the Pooh quote.
The illustration is a vintage image from the Graphic Fairy that I live traced and colored in Illustrator.
Available on Etsy
Labels:
illustrator,
poster
Monday, June 17, 2013
Sunday, June 16, 2013
Only Boring People Are Bored Print with Dancing Dogs, Monkeys and a Cat
This wonderful vintage illustration came from the Graphics Fairy.
It was black and white so I did a live trace in Illustrator and colored it with the the blob brush.
Available on Etsy
Labels:
illustrator,
poster
Saturday, June 15, 2013
Anime in Illustrator
My daughter received an anime style pencil sketch of herself from a friend. I redid the drawing for her in Illustrator. I used the pen tool for the line work and converted the lines to tapered brush strokes. The coloring was done using the Blob Brush. The blob brush turns the color into an editable mass instead of lots of brush strokes.
Labels:
illustration,
illustrator
Friday, June 14, 2013
Thursday, June 13, 2013
I'll Meet You Here Lomo Style Photography Poster
I took my digital photo from Huatulco, Mexico and applied Photoshop filters to make it resemble Lomography. I did a tutorial on my other blog 365 Projects if you want to play along at home.
Available on Etsy
Labels:
illustrator,
photograph,
photoshop,
poster
Wednesday, June 12, 2013
Let's Go Anywhere Photographic Poster
I have been very fortunate about getting window seats on planes; it saves me from having to arm wrestle passengers for their seat. There's a few places I don't care to visit since I want to travel safely but I'll pretty much go anywhere, anytime.
Available on Etsy
Labels:
illustrator,
photograph,
poster
Tuesday, June 11, 2013
Rubber Band Ball Poster
I used to have a huge rubber band ball on my desk. I started it after visiting the twine ball museum but when I closed my insurance agency I gave it to a child who used to come and visit it. For some reason the word "rubber" seems a little racy and I find that amusing. I also like showing a round object as square.
Available on Etsy
Labels:
illustrator,
poster
Sunday, June 9, 2013
Be The Reason Someone Smiles Today Poster
I love the sentiment, and the trip to Huatulco, Mexico where I took the photo was definitely smile worthy.
Available on Etsy
Labels:
illustrator,
photoshop,
poster
Saturday, June 8, 2013
Water Missippippi River Headwaters Poster
Early Sunday morning is the best time to go to Itasca State Park, you have the park all to yourself. I plan to do a poster for all the elements with photos taken at the cabin.
Available on Etsy
Labels:
illustrator,
photoshop,
poster
Friday, June 7, 2013
Digital Scrapbook Pages From Huatulco, Mexico
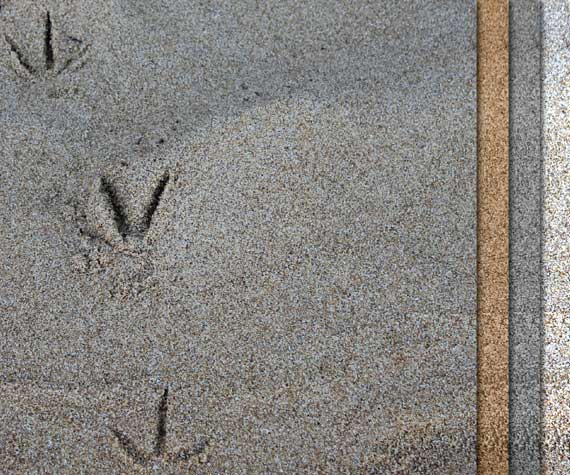
The images are from Huatulco, Mexico and include sea gull footprints on the beach and a palm tree with shadow. In addition to the original image, there is a sepia version, a subdued vintage image and a black and white.
They are available in my new Etsy shop, Pixels to Print.
Labels:
photograph,
photoshop
Monday, June 3, 2013
Oriole with an Orange June Checklist Calendar Illustration in Illustrator
I changed the style of my calendar to a weekly format to allow more writing area.
I'll check off the daily to do list and include specific notes about the day. The calendar pages are glued into my artist journal and tabbed for easy access.
Labels:
illustrator
Sunday, June 2, 2013
How To Make A Text Clipping Mask With A Photo Background In Illustrator
Place a background image or photo in a new document in illustrator.
Type over the photo.
If you want the letters to touch.
Type > Create Outlines
Object > Ungroup
Shift the letters until you like the placement.
Object > Compound Path > Make
Move the text where you want to to see the image in the letters on the background photo.
Select both the text and the background image.
Object > Clipping Mask >Make
If you don't want the letters to touch.
Type > Create Outlines
Object > Compound Path > Make
Move the text where you want to to see the image in the letters on the background photo.
Select both the text and the background image.
Object > Clipping Mask >Make
Labels:
illustrator,
illustrator tutorial,
tutorial
Saturday, June 1, 2013
Drinking Rum In The Morning Makes You A Pirate, Not An Alcoholic
Ahoy! I took this photo aboard a pirate ship sailing along the the shores of Cabo San Lucas. The captain wore Ray Ban sunglasses and the crew worked for tips; not exactly the bloodthirsty lot that may have sailed the area a century ago.
Available on Etsy
Labels:
photograph,
poster
Thursday, May 30, 2013
Humorous Walk In The Woods Poster
A walk in the woods helps me relax and release tension. The fact that I'm dragging a body is totally irrelevant. I particularly like the shovel and the implied hole it rests on.
I have directions for making the Instagram style effect on my blog 365 Projects.
Available on Etsy
Labels:
illustrator,
photoshop,
poster
Tuesday, May 28, 2013
How To Make A Stone Texture Background in Photoshop
Start a new file in Photoshop with a white background.
Channels Palette. Click the Create New Channel icon to add a new Alpha 1 channel.
Filter > Render > Difference Clouds. The dark areas make the crevices and light areas are hills.
Activate the RGB Channel.
Filter > Render > Light Effects. Play with the sliders until you are happy with the effect.
Labels:
photoshop,
photoshop tutorial,
tutorial
Thursday, May 9, 2013
Follow The River and You Will Find The Sea Poster
Wouldn't be nice to gently bob along to the ocean? I put a paper boat in the Mississippi River yesterday; it should be there soon.
Available on Etsy
Labels:
illustrator,
poster
Wednesday, April 17, 2013
Vintage Gift Seals Label Free Digital Download
I've been a little busy with my new blog, 365 Projects, but I wanted to share this sweet vintage package label. You can get a high resolution download here. The back of the paper label is blank so I can't tell you who the original manufacturer was.
Labels:
free download
Wednesday, March 6, 2013
Book Launch Party
Last night I went to a college friend's book launch party. The soiree was held in a gorgeous old library.
I haven't seen her since 1978 so I was looking forward to reconnecting with her and another college chum.
The encounter was a far cry from our college days, it was classic Minnesota nice. It's hard to believe how close we were before I moved out of the dorm.
Labels:
artist journal,
ink drawing
Subscribe to:
Posts (Atom)


